
The cloud laurel does not behave like a hedge that is trimmed twice a year. Each layer of foliage is built stem by stem, with pruning shears, respecting the internal architecture of the shrub. Any approach with hedge trimmers results in a sheared foliage, holes in the masses, and a loss of readability of the volumes. Here we detail the method to achieve a true niwaki on laurel, from the choice of the framework to the maintenance of the layers.
Selection of the framework: reading the shrub before cutting
A laurel intended for cloud pruning is first chosen for its branching. The bay laurel (Laurus nobilis) offers dense foliage, moderate growth, and good recovery capacity after severe pruning. The laurel-tin (Viburnum tinus), more compact with smaller leaves, allows for tight layers but tolerates less strong cutting.
Before any cutting, we observe the existing structure: number of main branches, spatial distribution, natural inclination of the shoots. The goal is to identify the future supporting branches that will each support a layer of foliage.
A successful niwaki relies on three to five main clouds, no more. Multiplying small masses of foliage results in a confusing outcome, lacking the readability that makes this technique so interesting. We recommend selecting the supporting branches based on their vertical spacing and the angle they form with the trunk, eliminating any crossing shoots or those growing inward.
To deepen the logic of formation and discover variations in ball or cone shapes, the resource that allows you to prune a ball laurel into a cloud lays the groundwork for the different topiary shapes applicable to laurels.
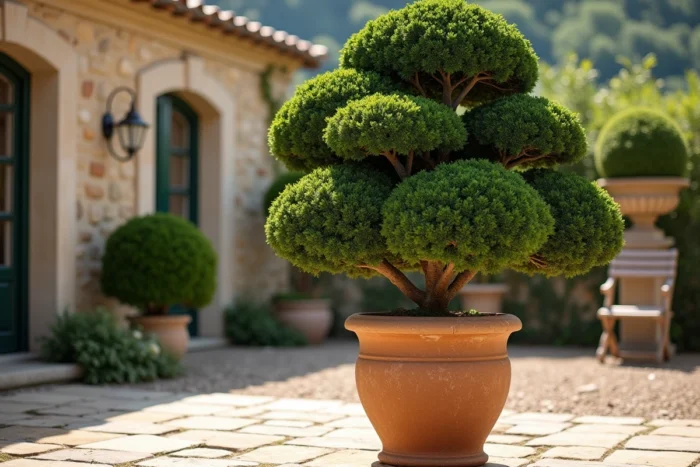
Cloud pruning technique on laurel: working with pruning shears stem by stem
The fundamental distinction with hedge trimming lies in the tool. The pruning shears are the only structural tool for a cloud shape. Hedge trimmers are only used for finishing touches on long straight hedges, never to sculpt a layer.
Clearing the trunk and supporting branches
The first step is to completely clean the trunk and the framework branches. Remove all lateral shoots, suckers, and adventitious shoots on the lower part and on the sections of branches located between two future layers.
This clearing highlights the bark and the line of the branches, which contribute as much to the aesthetics of the niwaki as the masses of foliage themselves. On a mature bay laurel, the bare trunk creates a sharp contrast with the upper layers.
Sculpting the layers of foliage
Each layer is worked from the inside out:
- Remove with pruning shears all dead, weak branches or those growing downwards inside the layer, to promote air and light circulation
- Shorten the peripheral shoots by cutting just above a bud oriented outward, to maintain the rounded shape
- Round off the top of the layer by cutting the shoots that exceed the general mass, progressing with small successive cuts
- Check the profile by stepping back regularly several meters to assess the overall silhouette
The underside of each layer remains clean and clear. This visible underside from the ground is the visual signature of the cloud. A layer whose base is not visible loses all its effect of airy lightness.
Pruning schedule and seasonal constraints of the cloud laurel
Formation pruning is done at the end of winter, between February and March, before the vegetation starts. The wounds heal quickly as soon as the sap rises, and the shrub rebuilds its foliage mass during spring.
Summer maintenance pruning is limited to light thinning, in July or August, to contain the vigorous shoots that distort the layers. On a bay laurel, moderate growth often makes a single summer pass sufficient.
In autumn and winter, we do not prune. Late cuts expose fresh tissues to frost and slow down healing. On a laurel-tin that blooms in winter, autumn pruning would also remove flower buds.

Structural errors that compromise a cloud laurel in the long term
The most common mistake is keeping too many supporting branches. A shrub loaded with eight or ten small layers gives a messy silhouette, difficult to maintain and costly in pruning time. Fewer, better-defined supporting branches produce a more readable effect.
Another common mistake: neglecting the clearance between the layers. If adventitious shoots recolonize the bare sections of branches between two masses of foliage, the full/empty contrast disappears in a single season. A cleaning pass of the internodes at each pruning intervention is essential.
Using hedge trimmers to save time on the layers causes cross cuts on the leaves, which brown and give the laurel a scorched appearance for several weeks. On a Laurus nobilis, each leaf cut in half visibly blackens, ruining the neat appearance of a niwaki.
The last trap is purely geometric: a perfectly spherical layer, trimmed with a string, produces an artificial effect far removed from the spirit of Japanese niwaki. Each mass of foliage benefits from retaining a slight asymmetry, one edge a bit thicker than another, to evoke the organic shape of a true cloud.
A laurel shaped into a cloud requires less volume of cutting than a classic hedge, but more precision and consistency. Two interventions per year, one for structure at the end of winter and one for finishing in summer, are sufficient to maintain the silhouette on a well-formed subject. The result, a persistent foliage structured in aerial volumes on a cleared trunk, brings a sculptural presence to the garden that neither the ball nor the cone can produce with the same strength.